
People have been clamoring for another zine swap after last year's wonderful exchange.
Rather than re-invent the wheel, I'm reposting my original tutorial for those of you who missed it the first time or need a refresher....
________________________
For this swap we are creating mini zines out of a single sheet of paper.
Rather than re-invent the wheel, I'm reposting my original tutorial for those of you who missed it the first time or need a refresher....
________________________
For this swap we are creating mini zines out of a single sheet of paper.

But first, what's a zine?
According to our good friends at wikipedia:
A zine (/ˈziːn/ ZEEN; an abbreviation of fanzine,
or magazine) is most commonly a small circulation self-published work
of original and/or appropriated texts and images usually reproduced via
photocopier.
For
this swap, we are creating a particular style of zine: one created
from a single sheet of standard 8.5 x 11 inch copy paper, with no binding
or stapling required.
A few folds and a single cut transforms the paper into a small booklet.
You will create an original master zine and then make 4 color copies to send for the swap.
****BONUS****
If you send a 5th zine for ME to keep, I will send you a zine in return. Because ohmygod I love zines. And it killed me to not keep every single one you guys made in the last swap.
****BONUS****
If you send a 5th zine for ME to keep, I will send you a zine in return. Because ohmygod I love zines. And it killed me to not keep every single one you guys made in the last swap.

I
will outline the steps in photos, but if you learn better by watching
and listening, I filmed an incredibly goofy video showing you the basic
technique and offering a few tips.
To get started, choose your topic.
Ideas include:
- A tutorial (I wrote one about how to make gelatin prints)
- A memoir (I wrote one about a road trip I took in 1989)
- A rant (I wrote one about this past never-ending winter)
- A fictional story
- An illustrated poem
- A tribute to your favorite .... (movie, hobby, artist, place, etc)
- A mini art journal - you could scan pages from your art journal and shrink them down to fit on the small pages or create original pages just for this swap (I made one from some of my favorite pieces from the Index-card-a-day project)
Don't feel limited by that list. The content and style is complete up to you. You can get more inspiration here and here.
Plus, if you search this blog for "zine" you'll see some sample pages from all the zines that were swapped in July.
Plus, if you search this blog for "zine" you'll see some sample pages from all the zines that were swapped in July.
Next, you need to plan your layout.
I
find it much easier to create the zine when the paper is still flat,
rather than after I've folded it, but you need to know how to sequence
your pages so they line up properly.
Here's a template:

and here's the master sheet of my road trip zine:

I
used a piece of painted card stock as my base, and I cut appropriately
sized rectangles out of more card stock to create the art for each
page. I glued the pages down according to the template and photocopied
this master sheet onto standard copy paper. It was a little tricky
making sure my 8 rectangles were glued with perfect alignment to where
the folds would be once I copied it.
For my gelatin print tutorial, I took one of my actual gelatin prints to use as the background for the zine:
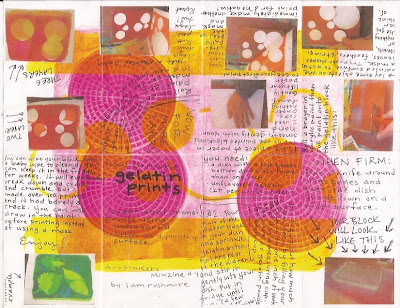
I
folded it so I could define the rectangles, then unfolded it, smoothed
it out, and wrote directly onto that sheet (turning the paper according
to the template so that my writing wouldn't be upside down once I folded
it.) I printed a few of my photos in tiny sizes and glued them onto
the sheet. The downside is that I kept making mistakes in my writing
which would ruin the whole sheet and make me start over. The upside is I
knew my text and pictures would line up perfectly within the folds.
It's time to fold and cut.
I suggest practicing this technique several times on plain paper before you try it with your color copies.
Fold it in half one way (I usually fold it back and forth and really crease it well on both sides)

Unfold it, then fold it in half the other way:

Now fold the edge toward the center and repeat on the other side.

Now you should have 8 rectangles and it's time to make the cut.
Unfold it, then fold it in half again this way:

Make a cut from the folded edge to the next fold line:

Unfold it and refold it this way:


Fold it so the front cover is on top and the fold for the book spine is on the left:


Need to see it in action?
Swap details:
- create an original mini zine out of one sheet of paper, using the technique shown.
- make four/five color copies of that zine. Keep your original for yourself, and send the four/five copies to me (cut, folded and ready to swap.)
- Make sure your name and email address and/or website is on the back of your zine.
- Put your zines in an envelope along with a mailing label with your name and address, and enough postage to cover the cost of mailing the envelope back to you. You don't need to include an empty envelope, or postage for five envelopes. You're going to get back five different zines in one envelope. (so it would be nice if they envelope you use to send them to me is somewhat sturdy so it will be easy for me to reuse.)
- You can also send me the cost of postage via paypal if you'd prefer - iamrushmore@gmail.com
- Drop it in the mail no later than May 27th:
Karen Isaacson
PO Box 532
Shrewsbury, MA 01545
United States


