
This guest hosting thing seems to be going pretty well so far. Are you quietly considering volunteering to host but afraid you won't know what to do?
Fear not - I've got tips and ideas and photos!
All you really need in order to host is a way to take pictures of the art and the technological know-how to email those pictures to me.
A spirit of adventure and a modicum of organization skills is helpful but not necessary. Here's how to swap in 10 easy steps (details to follow)
1. Decide on a theme and email me your idea along with your mailing address and an email address and when you'd like to host. Consider what you want to swap (post cards, ATCs, etc) and if there are any restrictions (must use watercolors...) I'll take care of writing the actual blog post.
2. Sit back and watch your mailbox for beautiful mail to start arriving.
3. When it does, open mail and admire art
4. Write down the person's name and how many pieces of art they sent
5. Scan or take pictures of each piece of art
6. Email the images to me - put the artist's name in the subject line and attach that artist's work to the email. Multiple images per email is great as long as all the images are from the same artist. (Bonus points if you can rename the images with the artist's name/swap name.)
7. I will post all those lovely pictures on the blog in batches
8. 10-14 days after the swap deadline you can gather up everything that's been sent to you and do the actual physical swapping
9. Once you've sorted all the art, stick on the mailing labels and drop everything in the mailbox
10. Bask in the satisfaction of a job well done
Organization tips:
- When I open an envelope I take out the address labels and store them separately. If there are stamps, money, notes or little gifts, I pull them out at that time as well. After scanning the images, I put the art back in the original envelope. I find if I didn't pull the extras out of the envelope right away I accidentally lose or throw away a lot of stuff.
- Since I have been known to host a lot of swaps at once, I keep all the mailing labels filed alphabetically in this little coupon organizer:
- I then crop and label the images and put them in a computer folder labeled with the name of the swap. (If you're guest hosting and don't know how to crop the images don't worry about it. Just send them as-is and I will happily crop them for you.) I got in the habit of re-naming each image with the artist's name, name of swap, and a number. (e.g. Karenround1.jpg, Karenround2.jpg, etc)
- I'm a spreadsheet nerd (and keep track of many swaps simultaneously) so I keep track of everything using Excel. Every time I get mail, I enter the artist's name on a spreadsheet (I keet one huge file for all my MMSA swaps and just made a new worksheet for each swap.) The name goes in one column and the number of pieces of art goes in another column.
- I like to do the opening/scanning/labeling every day or so finding it easier to spend just a few minutes a day on it rather than letting it pile up all week, but that's just me.
 |
| I have a special box where all the envelopes are stored after I've scanned the art. It has file-folder dividers to keep each swap separate. |
- I recommend waiting at least 10 days past the swap deadline to make sure all the art has arrived. I usually wait two full weeks. It once took 11 days for an envelope to get from Lynn in Connecticut to me in Massachusetts. She could have walked it to my house faster than that. There was no earthly reason it should have taken that long, but it did and I would have been bummed to complete the whole swap and THEN receive Lynn's art. It can be hard to wait that long, but it's worth it.
The day of the swap looks something like this….
I open the excel sheet for that swap, and sort
the list of names alphabetically. I bump up the font and the spacing and print out the list of artists and number of pieces they made.


I then take all my envelopes and arrange them on the dining
room table making sure there is one envelope for every person
on my list. (And because I'm an organization nerd, I arrange them alphabetically!) I take out the pieces
of art, again making sure the number of pieces of art in the envelope matches
the number next to the person’s name on the list. I lay the pieces of art on top of the
original envelope, and once everything is spread out and I’m confident that the
list matches what’s on the table, I cut that list into little strips of paper,
and put a piece of washi tape (or other low-tack tape) on the end of each strip
and stick it to the edge of the table.
Here’s what the whole set up looks like before I start swapping.
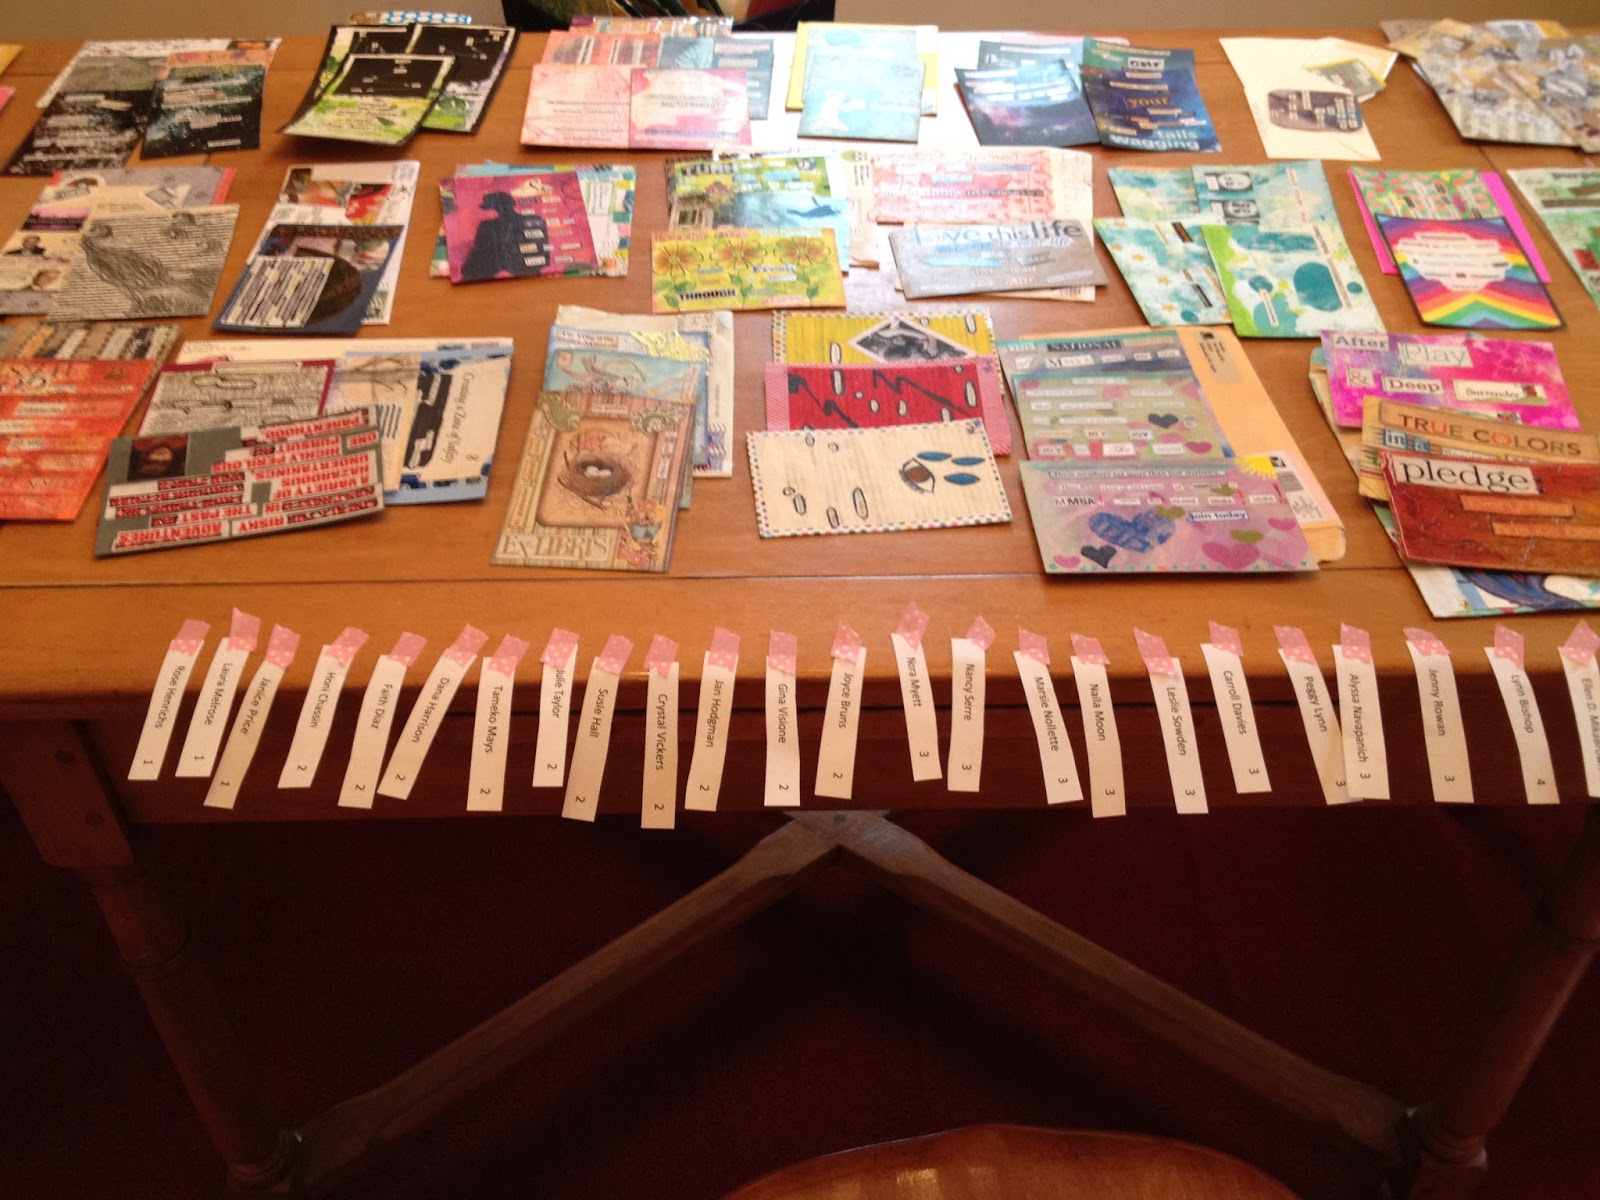 |
| Ready to start! |
 |
| close up of those little strips of paper |
Now I grab one of those little strips. It says “Ellen 4” on it. I know that means Ellen will receive four
postcards from four different artists. Keeping
the art in alphabetically order on top of its original envelope also helps me
from inadvertently sending Ellen one of her own postcards back to her. I look at all the art on the table and select
four cards for Ellen and then stick her name on top of the stack and set it
aside.
I continue in this way for each little strip of paper. I try to send a variety of art (maybe one abstract, one drawing, one collage, one with muted colors) and if you’ve been swapping with me for a while and I know your style/interests I might try to select something I think you will like. Obviously I can’t remember from week to week whose art I sent you, but I know a frequent swapper like Ellen has probably received a lot of mail from the “usual suspects” over the years, so if there is a first-time swapper on the table, I might try to include one of those in Ellen’s pile so she can meet someone new.
 |
| Piles of sorted postcards on the floor. Each pile has the recipient's name taped to it |
I continue in this way for each little strip of paper. I try to send a variety of art (maybe one abstract, one drawing, one collage, one with muted colors) and if you’ve been swapping with me for a while and I know your style/interests I might try to select something I think you will like. Obviously I can’t remember from week to week whose art I sent you, but I know a frequent swapper like Ellen has probably received a lot of mail from the “usual suspects” over the years, so if there is a first-time swapper on the table, I might try to include one of those in Ellen’s pile so she can meet someone new.
When I get to the last strip of paper (in this case, Valerie
4), I hold my breath to make sure there are four (and only four) cards left on
the table and that none of them are Valerie’s.
Most of the time my organizational efforts pay off and it works out
perfectly. Once in a while it doesn’t,
and I go back through all those little piles on the floor and make sure if your
label says “3” you have 3 postcards in your pile. This is where I catch my mistakes – someone
has too many or too few in their pile – and I quickly rectify the situation.
Now I clear the table of all the envelopes (keeping the
pretty ones, or the ones with uncancelled postage and recycling the rest.) I pick up all those piles and move them back
to the table in alphabetical order because it’s time for address labels!
I go through my little label organizer and pull out the
appropriate number of labels for each person and start sticking them onto the
postcards. Sometimes there isn’t a label
– because I’ve lost it or mis-filed it, or the artist forgot to send one – and
sometimes the label is too big for the allotted space on the post card. In these cases I grab a pen and write in the
address by hand. (Luckily this doesn’t
happen very often.)
 |
| Here are the sorted piles with the recipient's address labels on top, ready to be adhered |
Once everything is labeled, I open up that spreadsheet again, and start recording whose art each person is receiving. This isn't totally necessary, but sometimes people would email me with a question about the art they received and I could reference the list and see what was sent. This is also another way to double-check that I’m not sending someone their own art. Sometimes this happens; I’m typing names into my spreadsheet; “Ellen got art from Laurie, Carroll, Terrie and…..Ellen….OOPS!” I have to go into someone else’s pile and take out a card that isn’t made by Laurie, Carroll, Terrie or Ellen, and put a new label on it for Ellen, and put Ellen’s (which has been mistakenly addressed to herself) into that other person’s pile with another new label. There’s generally a fair amount of cursing and head-smacking when I do this, but I’m always glad I caught it before it went out in the mail.
So now I have a huge stack of addressed mail, and a
spreadsheet filled with the names of who gets what from whom. It’s time to check the postage. Again, this step isn't wholly necessary. People are supposed to attach postage and you can trust that they did it correctly and drop the whole pile in the mail just like that if you want. But I am a detail freak (and find that people occasionally don't understand postal rules and get the amount wrong.)
If there are any cards being sent to international artists I set them aside because they’re going to need more postage. If there are any cards without a stamp, I put them in a different pile. (sometimes people send me money via paypal instead of adhering stamps.)
If there are any cards being sent to international artists I set them aside because they’re going to need more postage. If there are any cards without a stamp, I put them in a different pile. (sometimes people send me money via paypal instead of adhering stamps.)
All the rest get sorted into piles based on whether they
have a $.35 postcard stamp attached or another type of stamp attached.
My lovely post office people once gave me my very own
handy-dandy mail standards template.

I take all those $.35 cards and make sure they fit within the 4.25” x 6” grid lines. If they don’t, I set them aside for additional postage. If they are the right size they go into my mail bag. I then take the pile of “other postage” cards and pull out any that seem questionable to my experienced eye. I line them up on the template to make sure they meet the standards for a “forever” stamp and if they don’t, I set them aside. All the others go in the mail bag. Now I take the pile of cards that have been set aside and calculate how much additional postage they will need. Everyone has been super generous over the years sending me loose extra postage in differing amounts so I always had stamps on hand and never had to buy postage out of pocket.
So that's it. Now I'm done and I'm ready to drop the big stack of cards in the mailbox and send them on their way to their new homes.
This may seem like a ridiculous number of steps, but it's really not that hard. And even though I learned through years of experience that this works best for me, it may not at all be what works best for YOU.
You are welcome to organize things any old way you please. As I said at the beginning, the only things you absolutely HAVE to do is take a picture of each piece of art and email it to me. After that it's up to you.
I hope, if you decide to host a swap here or elsewhere, you find this somewhat helpful and inspiring. I'm always happy to answer questions and provide lots of support via email if you are guest hosting.