painted papers - part 3

My mailbox holds new delights every single day.

Here are three papers from Arlyn.  This first one has crushed sea shells in one of the circles - how cool is that?


These next six papers are from Carroll,
but first check out the amazing envelope in which they arrived!


Each of Ellen's gelatin print "blots" features one of her signature haikus on the back.  
Bonus for the lucky recipient!


Here are seven lusciously layered papers from Laurie:


And seven from Mandy, including some of the marbled papers we made together recently:


Jan's papers are done on a wonderfully smooth/slick paper (is it photo paper?) and have an amazing glossy surface.


What will you do with the papers you receive?
Will you use them in an art journal?  Or cut them into postcard backgrounds?  Or tear them into small collage pieces?  Or fold them into an envelope?
There are so many possibilities!
If you make something with any of your swap papers, take a picture of it and add it to the MMSA flickr group (or email it to me).
We'd love to see how you used what you received.

mini zine - part 1

I'm so excited, I'm almost giddy.
The zines have started to arrive!
I have two so far.
I don't think I'll be able to keep up with scanning all the pages individually, and I also want to leave some mystery and surprise for the recipients, so I've scanned a random two-page spread as a teaser.

Both of these zines are from first-time-at-MMSA swappers.
Welcome to you both- I'm so glad you've jumped in!

First up, Linda's zine, titled "La Vie Boheme"


Next:  Sandra's zine, titled "my favorites of 2013, part 1, Jan-Jun"


The details of the swap, including a folding tutorial for this style of zine, can be found here.
and in case it wasn't clear (a few people have asked)
You can create your "master" zine in any style or medium you like.  It can be painting, drawing, writing, photography, collage, digital, mixed media....

When it's done, make five color photocopies (or computer printouts) of it and keep your original master for yourself.

I hope these two have inspired you and piqued your interest.  You've still got plenty of time to work on one of your own.  They don't need to be in the mail until July 29th.

Orange post cards - part 4

Here, at last, are the remainder of the joyful, juicy orange cards.


Two from Barbara:


three from Carlene: 


Three from Chris: 


Two from Corrine:


Four from Dawn:


Two from Ellen:


Three from Gina


One from Jan H.
(please welcome Jan to her first MMSA swap!)

Six from Judith:


What color should we do next?

"Put a Fish On It" postcard swap - due July 31st

My fabulous fishy friend, Mandy, has declared July to be "Put a Fish On It" month.
She's hosting a small swap for the art group we're both part of, and as soon as I saw her fish cards, I knew I had to try and squeak in one more MMSA swap for July.

Mandy has graciously allowed me to steal her idea and share her art with you all:


See more of Mandy's fish cards on her blog, and so much more of her beautiful art at her Flickr account.

Swap Details:
  • create postcard-sized art that features fish.  All styles of art are welcome -you do not need to create collages or mixed media pieces.  Feel free to draw, paint, sew, sculpt, digitize, etc.
  • make as many cards as you like - you will get back the same number you send
  • postcards will be mailed from my post office without envelopes so make sure whatever you create is sturdy enough to survive mail handling.
  • if you're sending me more than one, please make sure you insert waxed paper or parchment in between the cards so they don't get stuck together in the envelope
  • write a little message for your partner and be sure to include your return address (in case of postal delivery problems) and your email address so the recipient can thank you.
  • include an address label for each card you create
  • include stamps for each card you create (or send me cash, or send me postal money via paypal)
  • international swappers are welcome - the postage cost is $1.10 per card (paypal account is iamrushmore@gmail.com)
Postage and Card Size 
You are welcome to make any size postcard you want, but please pay attention to the following postal guidelines

  • In order to use the postcard rate (currently $.33) your card cannot be bigger than 4.25 x 6 inches, and it must be thin and flexible.  A 4x6 card that is thick, lumpy or doesn't bend, needs more postage than one of those "apple" stamps
  • If your card is a rectangle bigger than a postcard, but still flat and flexible, a regular $.46 "forever" stamp is what you need.
  • If your card is an unusual shape (square, round) or is flexible but has some lumpy embellishments it will probably cost you the "non machinable" rate of $.66
  • If your card doesn't bend, the post office considers it a package and will cost $2.07 to mail.
Mail your cards no later than July 31st
Karen Isaacson
PO Box 532
Shrewsbury, MA 01545
United States

Mail Art Monday - envelope tutorial

We've got a special guest blogger today - Pamela Gerard!
Pamela sends and receives an extraordinary amount of beautiful mail art, and blogs all about it at Cappuccino and Art Journal.
She is a continual source of inspiration to me, both on-line and in my mailbox.  Her blog is chock full of ideas, images and information about all things mail art.

I'm delighted she is here, sharing her envelope-making technique with us - just in time for our envelope swap.
There are lots of different ways to fold envelopes, and you are welcome to use any technique for the swap.  Google "envelope template" and you'll find all kinds of complicated and elaborate plans.  I love the simplicity of Pamela's approach, and her results are fantastic.  If you've looked at templates and been thoroughly confused and overwhelmed, this post is especially for you!
Take it away, Pamela...
__________________________________________________________

Making your own envelopes is really fast and easy, not to mention a whole lot of fun. I'm just going to show you the most basic and easy method here. 
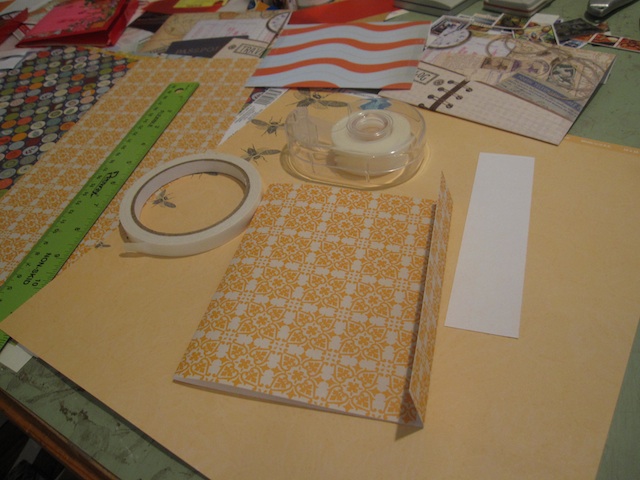
Gather up some paper and supplies like invisible tape, double-stick tape, labels and washi tape for decoration. You can tear up old falling apart books, use maps, tourist brochures, menus, flyers -- just about any paper ephemera you can think of. For this set, I used a vintage typewriting manual I picked up on a recent trip to LA.


I just use a very simple tri-fold to make almost all my envelopes -- no templates or measuring needed! Just lie your paper down on your workspace and decide where to fold to make a design you like. For these I folded down the the top along that red line to make the flap and folded the paper up from the bottom to frame the typewriter keyboard (trimming off the excess).


There you go -- you can see how it comes together.  Seal up the two sides with some invisible tape and put a strip of double stick tape on the flap (the kind that has paper on one side that you pull off when you are ready to seal).


And viola! Here you go -- an nice envelope ready to fill up with a (typed) letter. I almost always make a whole bunch of envelopes all at once, rather than one at a time. It just seems easier to make a themed bunch of them and I always have a supply ready to go.


Here are a bunch of typewriter envelopes I made. The final decorating doesn't happen until I fill them and address them.


And here is a bunch all finished and ready to get mailed out....

Here's an idea to get you started if you are afraid to start out using some favorite vintage ephemera -- crafts shops like Michael's have those 12x12 squares of scrapbooking paper on sale dirt cheap. Pick some up on sale and you can very easily make a bunch of cheap and colorful envelopes.


I just fold them in half and cut them along the fold. Then do the tri-fold....cut off any excess....

There you go -- easy!

I just trim off a little so the envelopes end up somewhere around 5x6 inches...


 This probably took about thirty seconds to do -- get your tapes out, invisible and double stick and you are ready for the fun part of decorating.


This one is for a bird loving friend -- I added some washi tape and a bird artistamp and it's ready to go.  One thing to remember, washi tape was not meant to be a permanent tape. I always do the "real" sealing with invisible tape and use the washi for decoration.

And I always tape the ends of washi tape down using invisible tape so it doesn't come loose in transit.

Outgoing handmade envelopes with artistamps, washi tape, vintage cancelled stamps.


Here's an envelope I made using a menu from my LA trip. 

And here's another that is from an old book I found on the street.


I'm sure many of you are already making envelopes but if you haven't yet, I hope this inspires to to get busy folding and having fun with paper. You can buy templates for envelope making in a number of places but I find it much easier to just fold up my own. The templates with the triangle shaped flaps really waste a whole lot of paper. All you really need is paper, tape and something to cut with and you're in business.


There are lots of other ways you can make envelopes, for example, you can sew up the sides with a sewing machine, you can buy clear plastic and sew or tape it up or you can paint or draw on the envelope....
________________________________________
Thanks, Pamela, for the great post.

Now it's time for all you readers to get folding!
The envelope swap deadline is August 12th.
Read all the swap details here.
See some of the envelopes we swapped last year, here and here.
And remember, once you get your beautiful envelopes, use them. As Pamela always says, you've got to
SEND GOOD MAIL TO GET GOOD MAIL!
__________________________________

Finally, in grand Mail Art Monday tradition, share your mail art links below.  We're especially interested in links to envelopes this week, but we welcome any kind of blog post or photo post related to mail art. 

Two things

Frequent MMSA swapper (and featured artist) Leslie, wants to start a round robin art journal.
(If you're not familiar with the concept: Everyone in the group starts her own art journal and then passes it to the next person in the group.  Eventually you get your own book back and everyone in the group has added to it.)
Anyone who is interested can email her directly for the details.

her email:
maugreall AT gmail DOT com

her blog:
http://onewomanshands.blogspot.com/

______________________________________________

Jessica Brogan hosts a wonderful altered card swap on a regular basis.
(formerly known as the "inspiration deck" swap)
You alter an entire deck of cards, mail them to her, and you get back 52 different cards from people all over the world.
I've done it twice and it's amazing.

Here's the website with all the details.